The Matrix lightning web component interface makes it easy to enter and manage data quickly and efficiently. Similar to a spreadsheet, you can select cells, navigate using your keyboard, and enter or update values directly. You can also copy and paste data, highlight ranges, and use the drag handle to fill adjacent cells with just a few clicks. The intuitive design allows you to work faster and more accurately, even when handling large amounts of data.
Prerequisite: Lightning Web Security
The Matrix lightning web component requires that administrators have enabled Lightning Web Security in their environments. For details, view the following Salesforce Help support document: Lightning Web Security.
Using the Matrix
- Select a cell by clicking it with your mouse or navigating to it using the arrow keys.
- Begin typing to overwrite the existing value or double-click to edit the current value directly.
- Press Enter to move to the cell below or Shift + Enter to move to the cell above.
- Use Tab to move to the next cell to the right and Shift + Tab to move to the cell to the left.
Highlighting and Selecting
- Click and drag your mouse to highlight a range of contiguous cells.
- Non-contiguous ranges cannot be selected.
Drag to Fill
- Use the handle at the bottom-right corner of a selected cell or range to drag and fill adjacent cells.
- The dragged cells will replicate the original value (it does not apply a pattern or sequence).
Copy and Paste
- Use standard keyboard shortcuts (Ctrl + C / Cmd + C to copy, Ctrl + V / Cmd + V to paste).
- When pasting, the data will adjust to fit the selected area if there is enough space.
- If the paste operation exceeds the available space (e.g., pasting 4 rows into a space with only 2 available rows), the data will be truncated.
Saving
When you make changes in the matrix, you’ll see a “You have unsaved changes” message in red at the top of the matrix. To save your changes:
- Click the Save button (floppy disk icon) in the top-right corner of the matrix.
- Once saved, the “You have unsaved changes” message will disappear.
How Data is Saved in Salesforce
The way data is saved depends on the selected View By setting:
| View By | Saving Behavior |
|---|---|
| Day or Time Tracking | Data is saved exactly as entered. If you enter 4 for a specific date and assignment, it will save 4 hours for that date. |
| Week or Month | Data is distributed based on the work week settings. For example, if you enter 20 in the week view and your work week is set to 5 days (Monday to Friday), the matrix will split the 20 hours into 4 hours per day. |
Date Navigation
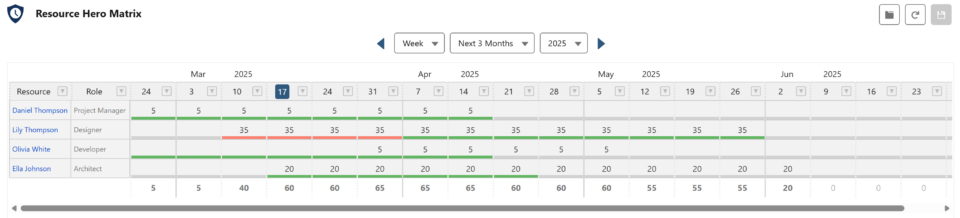
The Matrix interface includes a flexible date navigation system that allows you to control the time period displayed in the matrix. It includes several components:
Navigation Arrows
- Use the left and right arrows to move backward or forward through time.
- When you navigate beyond the current range of years, additional years will be dynamically added to the Year dropdown.
View By Dropdown
The View By dropdown determines the type of time period displayed in the matrix:
- Day – Each column represents a day.
- Week – Each column represents a week.
- Month – Each column represents a month.
- Single Week – Displays a single calendar week, where each column represents a day. When selected, the Week Options dropdown will appear.
Time Range Dropdown
The Time Range dropdown adjusts dynamically based on the selected View By option:
| View By | Time Ranges |
|---|---|
| Single Week | Week options are dynamically generated based on the selected month and year. |
| Day | Current Month Last 7 Days Last 14 Days Next 7 Days Next 14 Days |
| Week | Current Quarter 1st Quarter 2nd Quarter 3rd Quarter 4th Quarter Next 3 Months Next 6 Months 1st Half 2nd Half |
| Month | Next 12 Months Entire Year |
Year Dropdown
The Year dropdown shows the current year, the previous three years, and the next five years. If you navigate beyond the available range using the arrows, new years will be added dynamically.
Week Options Dropdown
When in Single Week view, an additional dropdown will appear, showing available calendar weeks based on the selected month and year.
Switching Between Views and Time Ranges
The matrix will attempt to align the new view and time range based on the currently selected cell when switching views:
- Week to Day View – If the selected cell is in the month of May and the user switches to Day view, the matrix will default to showing the days in May.
- Month to Week View – If the selected cell is in November and the user switches to Week view, the matrix will default to showing the weeks in the 4th Quarter.
- Month to Day View – If the selected cell is in November and the user switches to Day view, the matrix will default to showing the days in November.
When switching between fixed and rolling Time Ranges
- If you switch from a fixed time range (e.g., 2nd Quarter) to a rolling time range (e.g., Next 3 Months), the matrix will use the selected date as the baseline.
- For example, if the selected cell is in June within the 2nd Quarter and you switch to Next 3 Months, the matrix will display June as the starting point and show the following three months.
Adding the Matrix to a Lightning Page
You can easily add the Resource Hero Matrix component to any Lightning page:
- Go to Setup → User Interface → Lightning App Builder.
- Open the Lightning page where you want to add the Matrix, or create a new page.
- From the Components panel, search for RH Matrix and drag it onto the desired section of the page.
- Use the settings panel on the right side to adjust the available options. (See the table below for a list of available settings.)
- Save your changes and activate the page if needed.
Configuration Options
The following properties are available when configuring the LWC matrix:
| Name | Description | Available Values | Default |
|---|---|---|---|
| Header Label | The label that appears at the top of the matrix. | Any text | Resource Hero Matrix |
| Matrix Type | Determines how the matrix behaves and what data is displayed. For details, view the RH Matrix: The Matrix Type Setting support page. | Single Record RH Dashboard Standalone | Standalone |
| Default ViewBy / Time Range | Sets the default time view and range. | Single Week Day – Current Month Day – Last 7 Days Day – Last 14 Days Day – Next 7 Days Day – Next 14 Days Week – Current Quarter Week – 1st Quarter Week – 2nd Quarter Week – 3rd Quarter Week – 4th Quarter Week – Next 3 Months Week – Next 6 Months Week – 1st Half Week – 2nd Half Month – Next 12 Months Month – Entire Year | Week – Next 3 Months |
| Matrix Enabled Field | Controls which numeric field data is being manipulated by the matrix. | Forecast Actual More information about configuring additional numeric fields to work with the RH Matrix can be found on the Create a matrix on fields other than Forecast and Actual support page. | Forecast |
| Matrix Enabled Fields | Manually sets which fields are enabled in the matrix. | Comma-separated list of Resource Forecast field api names. For example: ResourceHeroApp__Forecast__c,ResourceHeroApp__Actual__c | None |
| Sort By Field | Field used to sort matrix rows. | Any field from Resource Assignment object | resourceheroapp__assigned_to__c |
| Sort By Order | Sort order for the matrix rows. | ASC DESC | ASC |
| Assignment Exclusion Field | Field used to exclude records from the matrix. More information can be found on the Assignment Exclusion Field support page. | Any checkbox / boolean field from Resource Assignment object | None |
| Resource Assignment Field Set Name | Controls which row header fields will be displayed within the Matrix. Any field set from the Resource Assignment object can be specified. For more information on creating field sets for use within the matrix, see the RH Matrix: Custom Field Set support post. If left plank, default fields from the RHA Matrix Fields custom setting will be use. | Any field set from Resource Assignment object | None |
| Component Max Height | Maximum height of the component in pixels. Once this limit is reached, scrollbars will appear. | Integer | 300 |
| Notes Panel | Determines the default state of the Notes panel for Day and Single Week views. | Default Open Default Closed Hidden | Default Closed |
| Show Grand Total Row | Shows or hides the grand total row at the bottom of the matrix. | True False | True |
| Read Only | Makes the matrix read-only. | True False | False |
Experience Cloud Specific Configuration Options
In addition to the above, the following configuration options are available within Experience Cloud:
| Name | Description | Available Values | Default |
|---|---|---|---|
| Record Id | When Matrix Type is Single Record (you are adding this component to an experience cloud record detail page), enter {!recordId} in this field. When Matrix Type is Standalone or RH Dashboard, leave this field blank. | blank {!recordId} | blank |
| Object API Name | When Matrix Type is Single Record (you are adding this component to an experience cloud record detail page), enter {!objectApiName} in this field. When Matrix Type is Standalone or RH Dashboard, leave this field blank. | blank {!objectApiName} | blank |
Permissions and Access
- The LWC Matrix follows the same permissions and field-level security as the Visualforce version.
- To ensure proper access, make sure that users have read and edit permissions for the relevant objects and fields. If a user does not have access to a field or object, the matrix will respect those security settings and prevent data entry or visibility accordingly.
